CollectiveAccess importing workflow

This step-by-step workflow illustrates how I import objects (metadata + files) into CollectiveAccess. I’m writing this post partly to give others an idea of how to import content into CollectiveAccess — but mainly it’s for my future self, who will likely have forgotten!

Caveats: Our CollectiveAccess instance is version 1.4, so some steps or options might not be the same for other versions. This is also just a record of what we at John Jay do when migrating/importing collections, so the steps might have to be different at your institution.

Refer to the official CollectiveAccess documentation for much more info: metadata importing and batch-uploading media. These are helpful and quite technical.

CollectiveAccess importing steps

Do all of these steps in a dev environment first to make sure everything is working, then do it for your live site.

  1. Create Excel spreadsheet of metadata to migrate
    • Here’s our example (.xlsx) from when we migrated some digitized photos from an old repo to CA
    • This can be organized however you want, though it may be easiest for each column to be a Dublin Core field. In ours, we have different fields for creators that are individuals vs. organizations.
  2. Create another Excel spreadsheet that will be the “mapping template” aka “importer”
    • Download the starter template (.xlsx) from CA wiki. This whole step is hard to understand, by the way, so set aside some time.
    • Here’s our example (.xlsx), which refers to the metadata spreadsheet above.
    • Every number in the “Source” column refers to the metadata spreadsheet: 1 is column A, 2 is B, …
    • Most of these will be Mapping rules, e.g. if Column A is the title of the object, the rule type would be Mapping, Source would be 1, and CA table element would be ca_objects.preferred_labels
      • Get the table elements from within CA (requires admin account): see Manage → Administration → User interfaces → Your Object Editor [click page icon] → Main Editor [click page icon] → Elements to display on this screen
      • Example row:
        Rule type Source CA table.element Options
        Mapping 9 ca_objects.lcsh {“delimiter”: “||”}
    • Don’t forget to fill out the Settings section below with importer title, etc.
  3. On your local machine, make a folder of the files you want to import
    • Filenames should be the same as identifiers in metadata sheet. This is how CA knows which files to attach to which metadata records
    • Only the primary media representations should be in this folder. Put secondary files (e.g., scan of the back of a photograph) should be in a different folder. These must be added manually, as far as I know.
  4. Upload the folder of items to import to pawtucket/admin/import.
    • Perform chmod 744 to all items inside the folder once you’ve done this, otherwise you’ll get an “unknown media type” error later.
  5. (Metadata import) In CA, go to Import → Data, upload the mapping template, and click the green arrow button. Select the metadata spreadsheet as the data format
    • “Dry run” may actually import (bug in v. 1.4, resolved in later version?). So again, try this in dev first.
    • Select “Debugging output” so if there’s an error, you’ll see what’s wrong
    • This step creates objects that have their metadata all filled out, but no media representations.
    • Imported successfully? Look everything over.
  6. (Connect uploaded media to metadata records) In CA, go to Import → Select the directory from step 5.
    • “Import all media, matching with existing records where possible.”
    • “Create set ____ with imported media.”
    • Put object status as inaccessible, media representation access as accessible — so that you have a chance to look everything over before it’s public. (As far as I know, it’s easy to batch-edit object access, but hard to batch-edit media access)
    • On the next screen, CA will slowly import your items. Guesstimate 1.5 minutes for every item. Don’t navigate away from this screen.
  7. Navigate to the set you just created and spot-check all items.
    • Batch-edit all objects to accessible to public when satisfied
  8. Add secondary representations manually where needed.

You may need to create multiple metadata spreadsheets and mapping templates if you’re importing a complex database. For instance, for trial transcripts that had multiple kinds of relationships with multiple entities, we just did 5 different metadata imports that tacked more metadata onto existing objects, rather than creating one monster metadata import.

You can switch steps 5 and 6 if you want, I believe, though since 5 is easy to look over and 6 takes a long time to do, I prefer my order.

Again, I urge you to try this on your dev instance of CA first (you should totally have a dev/test instance). And let me know if you want to know how to batch-delete items.

Good luck!
GoSoapbox for library class sessions

Snapshot of a poll: "What are you most excited to learn about today?" "How the library can save me money on textbooks, the quiet study area, and other options"
Screenshot of a GoSoapbox poll (results below)

I’ve spent the last year experimenting with incorporating active learning practices into my library “one-shot” sessions (so-called because you have one shot to cover all the library research basics college students will need for the next 4 years) (I am not throwing away my [one] shot). So far, my biggest success has been adapting Heads Up! for the classroom, which starts the class off with high energy and big laughs — plus totally connects to the concept of keywords. But it’s an activity for extroverts, so to balance it out, I went looking for a way to bring the introverts into participatory activities, too.

Classroom “clickers” are a solid way of encouraging participation from those who’d rather not speak up in class. Clickers are simple handheld devices that let students vote anonymously in polls whose results appear in real time on the screen. Big science classes often use them at my institution. Our library has a full set of clickers — but unfortunately, the PowerPoint plugin did not work on my Mac. Even if it had, it would have required a lot of setup.

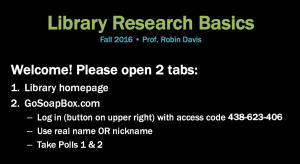
Welcome! Please open two tabs: library website and gosoapbox.com, with code xxx-xxx-xxx. Use your real name or nickname
The slide on the screen when the class walks in

So I was super happy to find GoSoapbox, a web-based clicker alternative, plus more. It’s ideal for classroom labs, where every student is at their own computer. Free instructor accounts are limited to classes of 30 students or fewer. Instructors can make multiple classes (“events”). These events are saved under the instructor’s account and can be accessed again later.

See my slide to the right, which is on the board when students trickle in before class starts. They must sign in at gosoapbox.com with an access code, e.g., 438-623-406, and enter their name or nickname. (You can log into that event yourself to try out how it works from a student POV.) I also put login info in small text on students’ handouts for latecomers or those who closed their tab accidentally. Edit: there’s an even easier way to get students into the event. See Advanced Features at the bottom of this post.

Things you can do in a library class using GoSoapbox

Followed by actual results from my library one-shots

Polls

  • Multiple-choice questions (no multiple-answer selections)
  • Results displayed as bar or pie chart; optionally visible in aggregate to all students
  • Good way to open the session to get a reading of the class and what they expect from you/the library
  • Instructors can email results to themselves

Discussions

  • Freeform text field visible to everybody in real-time
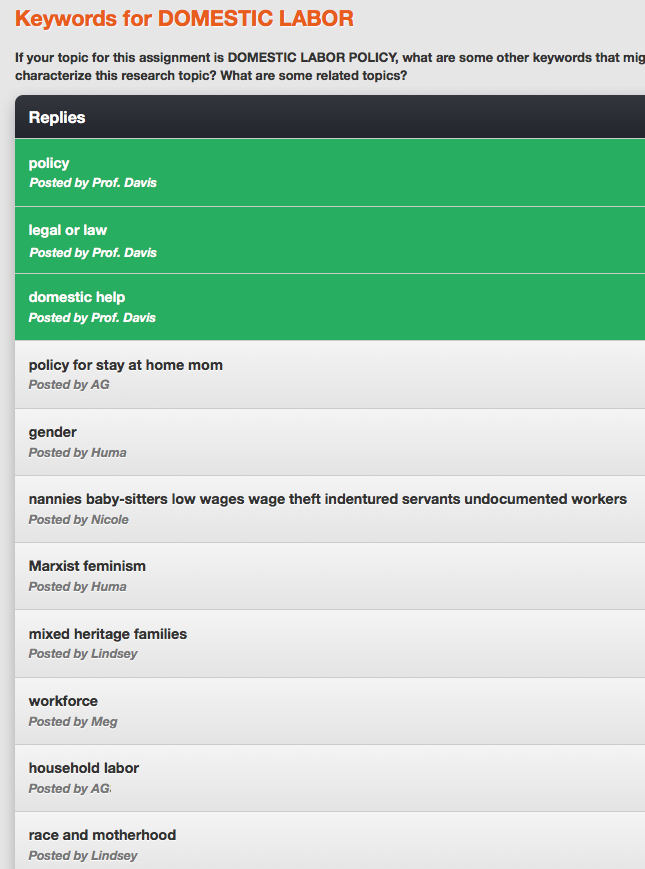
  • Useful for crowdsourcing keywords on a common research question; they can access this keyword list in class and afterward (put the URL on their handout)
  • My colleague, Marta, uses this as a knowledge checkpoint. For instance, she’ll put up an example research question and ask them what the keywords in the question are. They submit almost identical answers immediately, and she displays the results on the screen
  • Instructors can email results to themselves

Quizzes

  • Results visible individually to students, and in aggregate as an Excel download to instructor (results cannot be viewed in real-time by the instructor though, I think, weirdly)
  • I haven’t used this; I keep one up “locked” (hidden from view) but ready to go in case I miraculously have 10 extra minutes

Confusion barometer

  • Results are visible in real-time on instructor’s dashboard, e.g., 2 of 24 students are confused right now
  • I haven’t had any students actually use this, though

Social Q&A (off by default; turn on in Moderate This Event » Enable/Disable Features)

  • Students can ask and add answers to questions; they can also upvote questions they like
  • I haven’t used this yet

Psst… Save time

You can copy events — that is, you can copy over all the polls and discussion Qs into a new event for a fresh class.

Examples from my classes

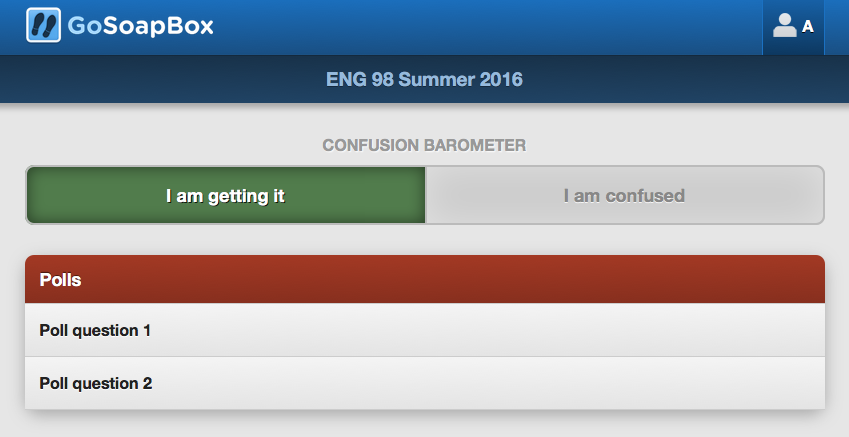
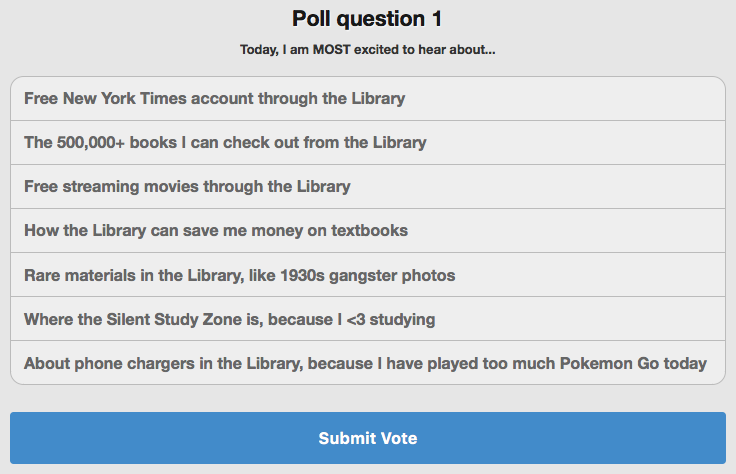
Confusion barometer: I am getting it or I am not getting it. Polls: Question 1 and Question 2.
What students see when they log in (I gave my poll questions generic titles, but they don’t have be so bland)

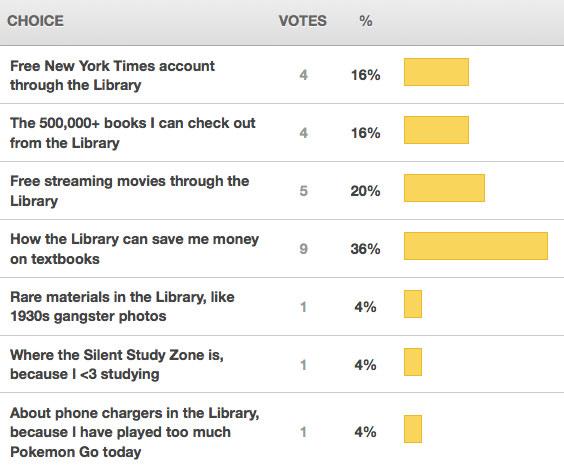
Most students want to know how the library can save them money on textbooks. They also want to know about streaming movies, books to checkout, and a free NYT account
Poll results in response to the question: “What are you most excited to learn about today?” This lets me tailor what I cover, and it gives students a preview of the more exciting aspects of their college library.

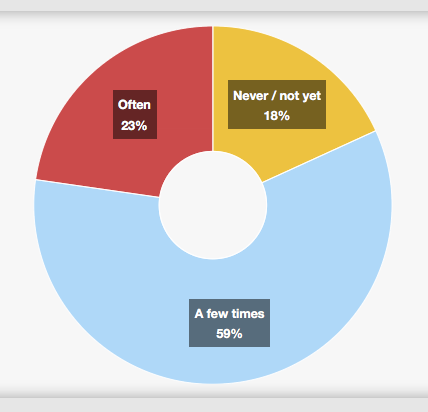
59% a few times, 23% often, 18% never
Poll in response to the question, “How often do you use your local public library?” (n=22)

Discussion about a class research question that their prof emailed me ahead of time. This was a prelude to searching databases using a “mix and match” method utilizing compiled keywords. I gave this brilliant class 5 minutes, and their keyword lists were quite long and very good! I was blown away. (They each had their own take on the policy question, but it was still useful to them to think about concepts their classmates brought up.)

Edited August 31, 2016 to add…

Advanced features

Toggling display

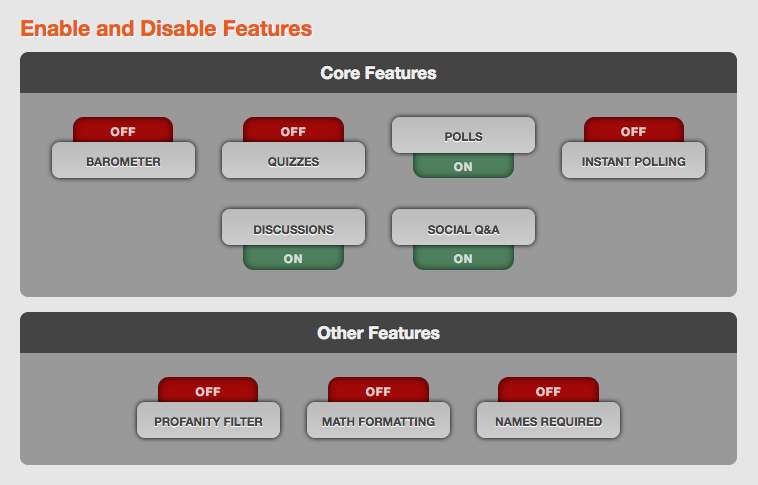
Under Moderate This event » Enable and Disable Features, you have the option to turn on and off some things:

Some features are toggled: Barometer, Off. Names required, Off. Discussions, On.

I usually only turn on polls and discussions. I turn off Names Required so students feel freer to participate. And it’s a college class, so I turn off Profanity Filter, too, especially since some students are researching things like sex work policy.

Making access easier

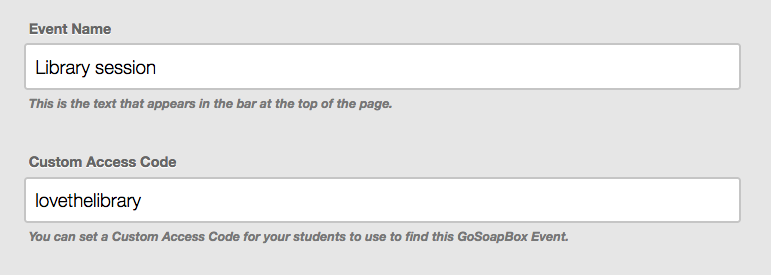
Under Moderate This Event » Change Event Details, you can customize the access code:

Access code: "library love"

…But you can also do away with an access code altogether! The event URL, minus “/#!/dashboard”, gives anyone instant access to your event. So for instance, I could email students this URL:

app.gosoapbox.com/event/438623406

Or I could post a shortlink on the board, like so:

bit.ly/eng98library

Bitly lets you customize what comes after the slash, as long as it’s a URL that hasn’t been taken yet. I think this is the easiest way to pop students into your event, without having to fiddle with access codes and so on.

Do you use GoSoapbox? What are some other ways a library one-shot could use polls and discussions?

What did I do this year? 2015–16 edition

word cloud

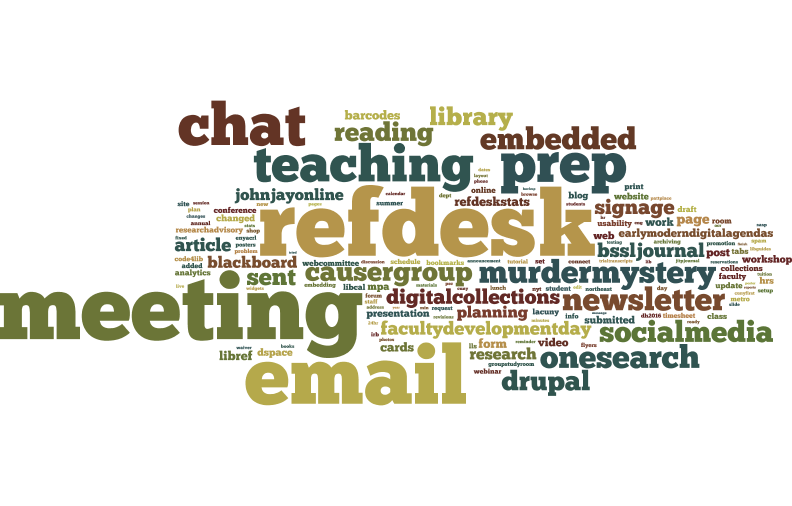
I jump-start my annual self-evaluation process with a low-level text analysis of my work log, essentially composed of “done” and “to do” bullet points. I normalized the text (e.g. emailed to email and Digital Collections to digitalcollections), removed personal names, and ran the all “done” items through Wordle.

2015–16 was my fourth year in my job and the fourth time I did this. (See 2012–13, 2013–14, and 2014–15). I do this because it can be difficult to remember what I was up to many months ago. It’s also a basic visualization of where my time is spent. The more an item is mentioned, the more days I worked on it for at least an hour or so. (Which may be misleading — I think I spent more hours on teaching and prep for teaching, but because I staffed the ref desk for a short shift on more days, “refdesk” appears larger.)

What did I do at my job this year?

  • teaching: I taught a library instruction session (“one-shot”) in 16 on-campus classes and 5 online classes. I taught twice as many classes as I did last year.
  • embedded: For each online class, I was embedded in the Blackboard course for a full week, posting material and answering questions in the forum. (See my post about this.)
  • socialmedia: I post things on Twitter and Facebook, along with several colleagues. I run the Instagram account all by me onesy.
  • bssl: I published four columns in Behavioral & Social Sciences Librarian. (See all.)
  • murdermystery: I ran this super-fun activity in the spring semester and began preparing for a summer session.
  • refdesk: I staffed the Reference Desk for 105 hours.
  • chat: I staffed chat and SMS for 77 hours. (I replaced “chatted with X” with “meeting” to disambiguate.)
  • drupal, digitalcollections, and onesearch: Worked on web stuff that runs the library websites.

I also emailed a lot and had a lot of meetings. What’s also interesting is how much I used the word prep. This is often related in the work log to teaching, and I did teach double the number of classes I taught last year. But I think it also reflects an improvement in my time management skills!

I am also trying really hard to carve out more time for reading. At work, I mostly read articles and blogs related to the intersection of technology and library practices, with a healthy dose of DH and privacy activism.

Embedded librarianship in Blackboard: examples

Half of my title is “Distance Services Librarian,” and while I had taken online courses while obtaining my library science degree, I wasn’t sure how to start integrating library resources into online courses, which have grown massively in number here at John Jay. I talked with a lot of librarians at other colleges who worked with online classes, and many said they’d been  embedded librarians.

The literature about embedded librarianship is either about a librarian assigned to an in-person class who shows up in the classroom every week, which is not what we’re talking about and also sounds v. exhausting, or about a librarian who visits a Blackboard course and posts content. Looking into the latter, there are many articles about the topic, but not a lot of actual examples. So here are some from my own experience.

Workflow of our embedded librarian program

  1. Instructors request a librarian to be enrolled in their online-only course for a week. Librarians arrange who’s going to take on the course.
  2. The librarian and instructor discuss which needs should be addressed. The librarian runs tentative curriculum (bulleted list of items they’ll post) by the instructor, just to make sure all objectives are hit.
  3. The Blackboard admin enrolls the librarian in the course with the instructor’s permission. On our campus, there’s a dedicated Librarian role in Blackboard, which has all the power of an instructor role except accessing the grade center.
  4. The librarian posts a folder of content early on Monday or the Friday before. See below for examples.
  5. During the week, the librarian answers questions in a dedicated discussion forum. This often reaches into the weekend, with several questions coming in on Sunday night, so the librarian should set expectations, e.g., “will respond to your questions within one business day.”
  6. The Blackboard admin un-enrolls the librarian.

Examples of embedded librarianship in Blackboard

These are screenshots from courses (edited to anonymize everything but me).

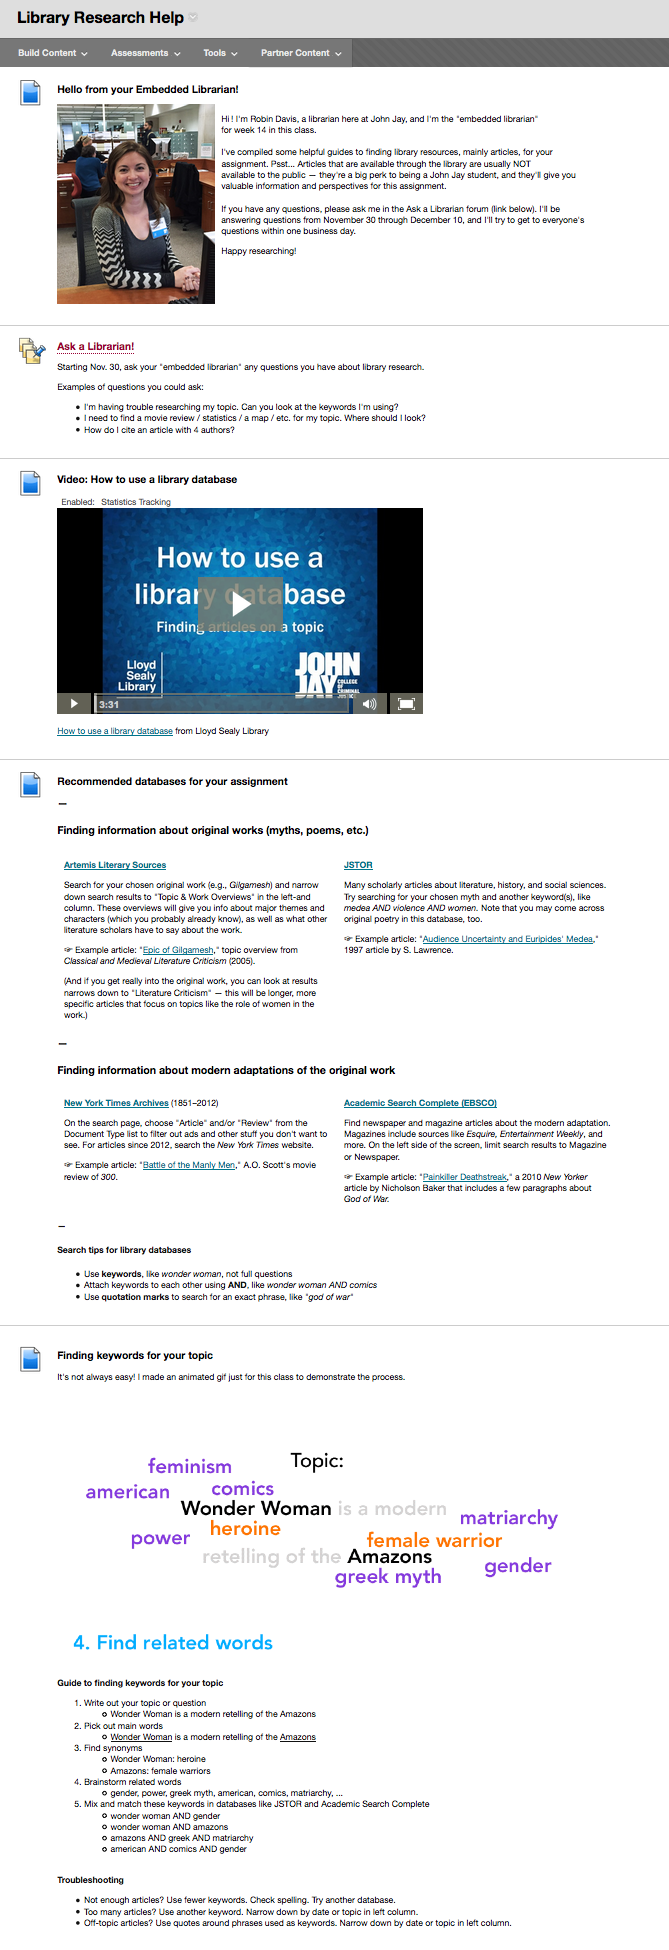
Example of content posted in a Blackboard course by a librarian: tutorial video, recommended databases, animated gif about keywords, citation information
Example from a lit class. Click to view larger

Read more

Invisible spam pages on our website: how we locked out a hacker

TL;DR: A hacker uploaded a fake JPG file containing PHP code that generated “invisible” spam blog posts on our website. To avoid this happening to you, block inactive accounts in Drupal and monitor Google Search Console reports.

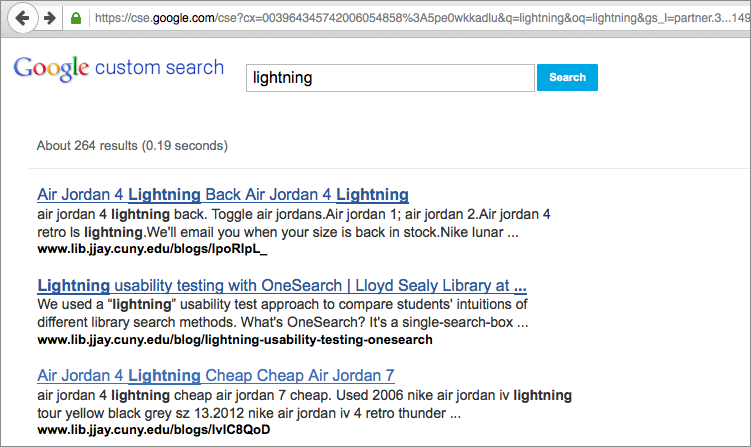
I noticed something odd on the library website the other day: a search of our site displayed a ton of spam in the Google Custom Search Engine (CSE) results.

google CSE spam

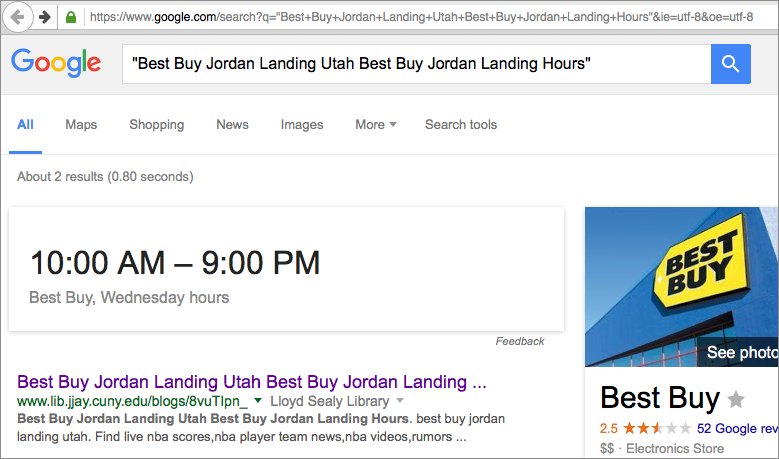
But when I clicked on the links for those supposed blog posts, I’d get a 404 Page Not Found error. It was like these spammy blog posts didn’t seem to exist except for in search results. I thought this was some kind of fake-URL generation visible just in the CSE (similar to fake referral URLs in Analytics), but regular Google was seeing these spammy blog posts as being on our site as well if I searched for an exact title.

spam results on google after searching for exact spam title

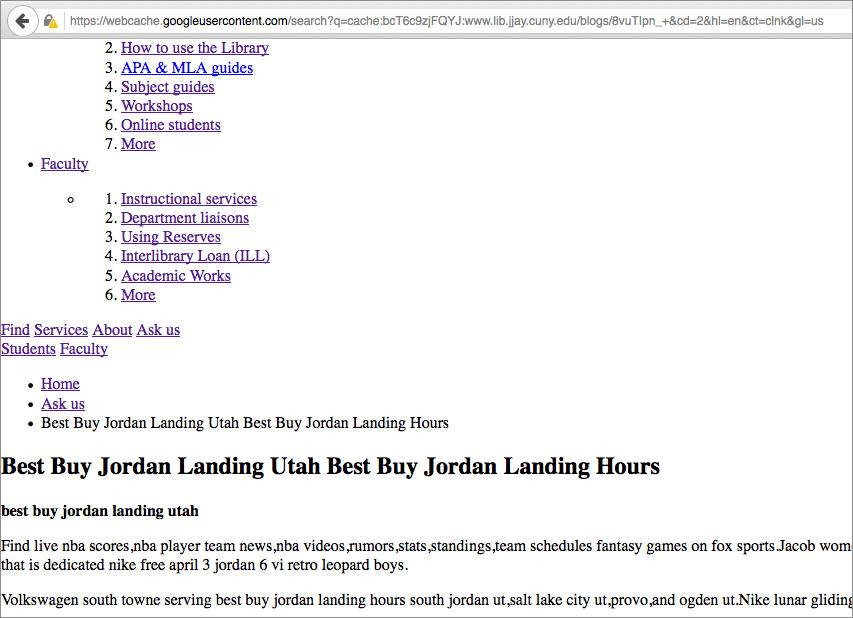
Still, Google was “seeing” these blog posts that kept netting 404 errors. I looked at the cached page, however, and saw that Google had indexed what looked like an actual page on our site, complete with the menu options.

cached page displaying spam text next to actual site text

Cloaked URLs

Not knowing much more, I had to assume that there were two versions of these spam blog posts: the ones humans saw when they clicked on a link, and the ones that Google saw when its bots indexed the page. After some light research, I found that this is called “cloaking.” Google does not like this, and I eventually received an email from Webmaster Tools with the subject “Hacked content detected.”

It was at this point that we alerted the IT department at our college to let them know there was a problem and that we were working on it (we run our own servers).

Finding the point of entry

Now I had to figure out if there was actually content being injected into our site. Nothing about the website looked different, and Drupal did not list any new pages, but someone was posting invisible content, purely to show up in Google’s search results and build some kind of network of spam content. Another suspicious thing: these URLs contained /blogs/, but our actual blog posts have URLs with /blog/, suggesting spoofed content. In Drupal, I looked at all the reports and logs I could find. Under the People menu, I noticed that 1 week ago, someone had signed into the site with a username for a former consultant who hadn’t worked on the site in two years.

Inactive account had signed in 1 week, 4 days ago

Yikes. So it looks like someone had hacked into an old, inactive admin account. I emailed our consultant and asked if they’d happened to sign in, and they replied Nope, and added that they didn’t even like Nikes. Hmm.

So I blocked that account, as well as accounts that hadn’t been used within the past year. I also reset everyone’s passwords and recommended they follow my tips for building a memorable and hard-to-hack password.

Clues from Google Search Console

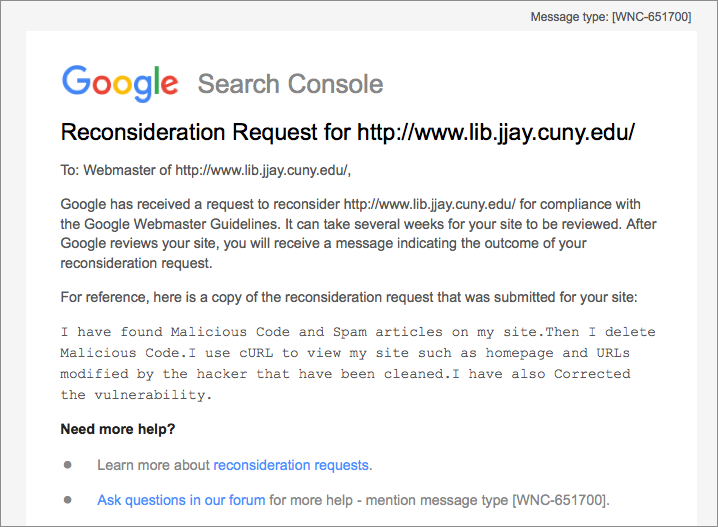
The spammy content was still online. Just as I was investigating the problem, I got this mysterious message in my inbox from Google Search Console (SC). Background: In SC, site owners can set preferences for how their site appears in Google search results and track things like how many other websites like to their website. There’s no ability to change the content; it’s mostly a monitoring site.

reconsideration request from google

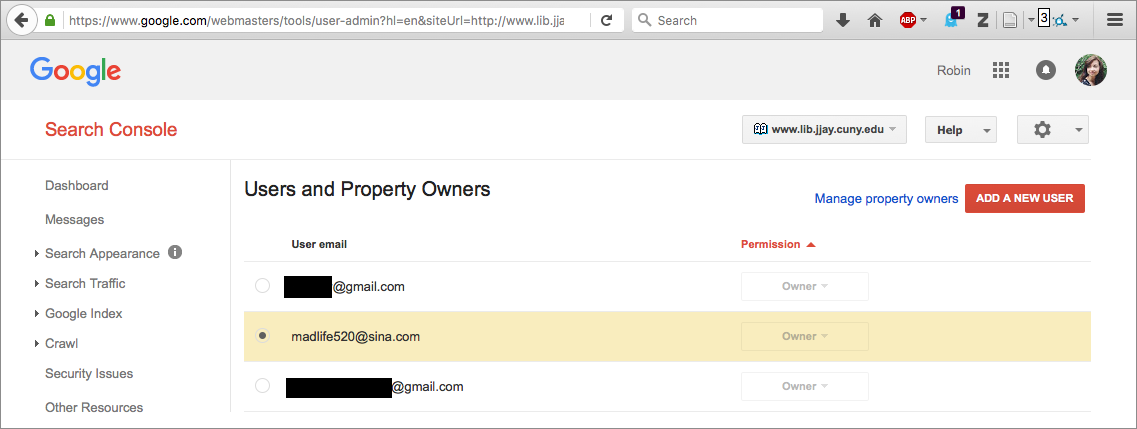
I didn’t write that reconsideration request. Neither did our webmaster, Mandy, or anybody who would have access to the Search Console. Lo and behold, the hacker had claimed site ownership in the Search Console:

madlife520 is listed as a site owner in google search console

Now our hacker had a name: Madlife520. (Cool username, bro!) And they’d signed up for SC, probably because they wanted stats for how well their spam posts were doing and to reassure Google that the content was legit.

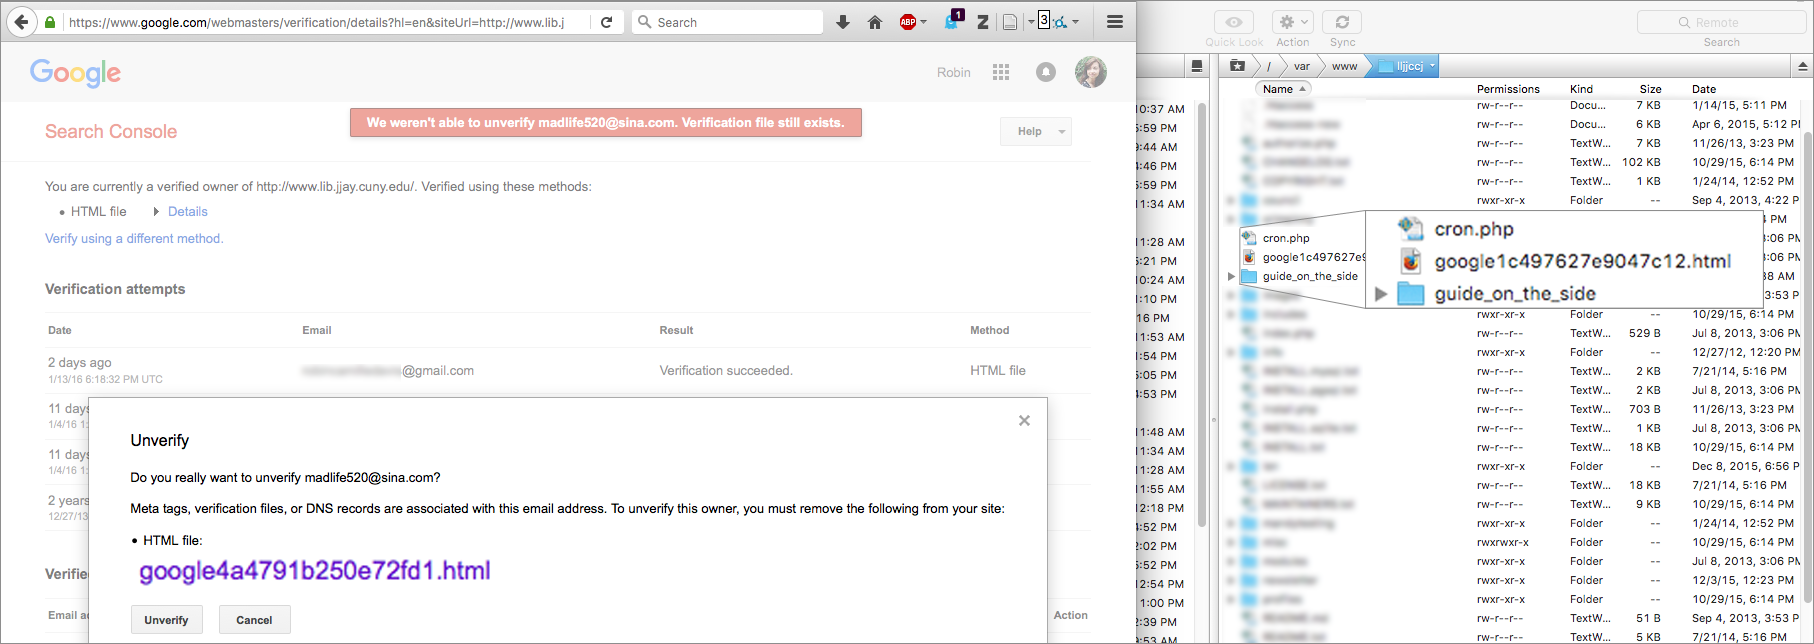
But Search Console wouldn’t let me un-verify Madlife520 as a site owner. To be a verified site owner, you can upload a special HTML file they provide to your website, with the idea that only a true site owner would be able to do that.

google alert: cannot un-verify as HTML file is still there. FTP client window: HTML file is NOT there.

But here’s where I felt truly crazy. Google said Madlife520’s verification file was still online. But we couldn’t find it! The only verification file was mine (ending in c12.html, not fd1.html). Another invisible file. What was going on? Why couldn’t we see what Google could see?

Finding malicious code

Geng, our whipsmart systems manager, did a full-text search of the files on our server and found the text string google4a4…fd1.html in the contents of a JPG file in …/private/default_images/. Yep, not the actual HTML file itself, but a line in a JPG file. Files in /private/ are usually images uploaded to our slideshow or syllabi that professors send through our schedule-a-class webform — files submitted through Drupal, not uploaded directly to the server.

So it looks like this: Madlife520 had logged into Drupal with an inactive account and uploaded a text file with a .JPG extension to a module or form (not sure where yet). This text file contained PHP code that dictated that if Google or other search engines asked for the URL of these spam blog posts, the site would serve up spammy content from another website; if a person clicked on that URL, it would display a 404 Page Not Found page. Moreover, this PHP code spoofed the Google Search Console verification file, making Google think it was there when it actually wasn’t. All of this was done very subtly — aside from weird search results, nothing on the site looked or felt differently, probably in the hope that we wouldn’t notice anything unusual so the spam could stay up for as long as possible.

Steps taken to lock out the hacker

Geng saved a local file of the PHP code, then deleted it from the server. He also made the subdirectory they were in read-only. Mandy, our webmaster, installed the Honeypot module in Drupal, which adds an invisible “URL: ___” field to all webforms that bots will keep trying to fill without ever successfully logging in or submitting a form, in case that might prevent password-cracking software. On my end, I blocked all inactive Drupal accounts, reset all passwords, unverified Madlife520 from Search Console, and blocked IPs that had attempted to access our site a suspiciously high number of times (these IPs were all in a block located in the Netherlands, oddly).

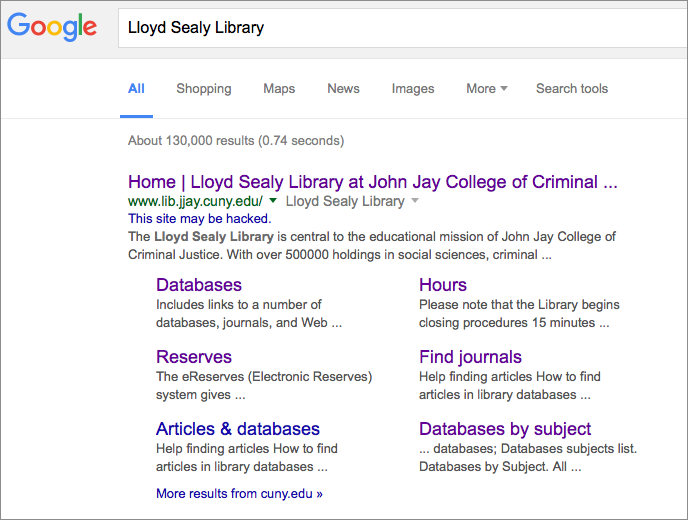
At this point, Google is still suspicious of our site:

"This site may be hacked" warning beneath Lloyd Sealy Library search result

But I submitted a Reconsideration Request through Search Console — this time, actually written by me.

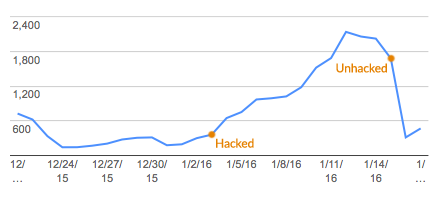
And it seems that the spammy content is no longer accessible, and we’re seeing far fewer link clicks on our website than before these actions.

marked increase, then decrease in clicked links to our site

I’m happy that we were able to curb the spam and (we hope) lock out the hacker in just over a week, all during winter break when our legitimate traffic is low. We’re continuing to monitor all the pulse points of our site, since we don’t know for sure there isn’t other malicious code somewhere.

I posted this in case someone, somewhere, is in their office on a Friday at 5pm, frantically googling invisible posts drupal spam urls 404??? like I was. If you are, good luck!