Category: How to

CollectiveAccess importing workflow

This step-by-step workflow illustrates how I import objects (metadata + files) into CollectiveAccess. I’m writing this post partly to give others an idea of how to import content into CollectiveAccess — but mainly it’s for my future self, who will likely have forgotten!

Caveats: Our CollectiveAccess instance is version 1.4, so some steps or options might not be the same for other versions. This is also just a record of what we at John Jay do when migrating/importing collections, so the steps might have to be different at your institution.

Refer to the official CollectiveAccess documentation for much more info: metadata importing and batch-uploading media. These are helpful and quite technical.

CollectiveAccess importing steps

Do all of these steps in a dev environment first to make sure everything is working, then do it for your live site.

  1. Create Excel spreadsheet of metadata to migrate
    • Here’s our example (.xlsx) from when we migrated some digitized photos from an old repo to CA
    • This can be organized however you want, though it may be easiest for each column to be a Dublin Core field. In ours, we have different fields for creators that are individuals vs. organizations.
  2. Create another Excel spreadsheet that will be the “mapping template” aka “importer”
    • Download the starter template (.xlsx) from CA wiki. This whole step is hard to understand, by the way, so set aside some time.
    • Here’s our example (.xlsx), which refers to the metadata spreadsheet above.
    • Every number in the “Source” column refers to the metadata spreadsheet: 1 is column A, 2 is B, …
    • Most of these will be Mapping rules, e.g. if Column A is the title of the object, the rule type would be Mapping, Source would be 1, and CA table element would be ca_objects.preferred_labels
      • Get the table elements from within CA (requires admin account): see Manage → Administration → User interfaces → Your Object Editor [click page icon] → Main Editor [click page icon] → Elements to display on this screen
      • Example row:
        Rule type Source CA table.element Options
        Mapping 9 ca_objects.lcsh {“delimiter”: “||”}
    • Don’t forget to fill out the Settings section below with importer title, etc.
  3. On your local machine, make a folder of the files you want to import
    • Filenames should be the same as identifiers in metadata sheet. This is how CA knows which files to attach to which metadata records
    • Only the primary media representations should be in this folder. Put secondary files (e.g., scan of the back of a photograph) should be in a different folder. These must be added manually, as far as I know.
  4. Upload the folder of items to import to pawtucket/admin/import.
    • Perform chmod 744 to all items inside the folder once you’ve done this, otherwise you’ll get an “unknown media type” error later.
  5. (Metadata import) In CA, go to Import → Data, upload the mapping template, and click the green arrow button. Select the metadata spreadsheet as the data format
    • “Dry run” may actually import (bug in v. 1.4, resolved in later version?). So again, try this in dev first.
    • Select “Debugging output” so if there’s an error, you’ll see what’s wrong
    • This step creates objects that have their metadata all filled out, but no media representations.
    • Imported successfully? Look everything over.
  6. (Connect uploaded media to metadata records) In CA, go to Import → Select the directory from step 5.
    • “Import all media, matching with existing records where possible.”
    • “Create set ____ with imported media.”
    • Put object status as inaccessible, media representation access as accessible — so that you have a chance to look everything over before it’s public. (As far as I know, it’s easy to batch-edit object access, but hard to batch-edit media access)
    • On the next screen, CA will slowly import your items. Guesstimate 1.5 minutes for every item. Don’t navigate away from this screen.
  7. Navigate to the set you just created and spot-check all items.
    • Batch-edit all objects to accessible to public when satisfied
  8. Add secondary representations manually where needed.

You may need to create multiple metadata spreadsheets and mapping templates if you’re importing a complex database. For instance, for trial transcripts that had multiple kinds of relationships with multiple entities, we just did 5 different metadata imports that tacked more metadata onto existing objects, rather than creating one monster metadata import.

You can switch steps 5 and 6 if you want, I believe, though since 5 is easy to look over and 6 takes a long time to do, I prefer my order.

Again, I urge you to try this on your dev instance of CA first (you should totally have a dev/test instance). And let me know if you want to know how to batch-delete items.

Good luck!
Embedded librarianship in Blackboard: examples

Half of my title is “Distance Services Librarian,” and while I had taken online courses while obtaining my library science degree, I wasn’t sure how to start integrating library resources into online courses, which have grown massively in number here at John Jay. I talked with a lot of librarians at other colleges who worked with online classes, and many said they’d been  embedded librarians.

The literature about embedded librarianship is either about a librarian assigned to an in-person class who shows up in the classroom every week, which is not what we’re talking about and also sounds v. exhausting, or about a librarian who visits a Blackboard course and posts content. Looking into the latter, there are many articles about the topic, but not a lot of actual examples. So here are some from my own experience.

Workflow of our embedded librarian program

  1. Instructors request a librarian to be enrolled in their online-only course for a week. Librarians arrange who’s going to take on the course.
  2. The librarian and instructor discuss which needs should be addressed. The librarian runs tentative curriculum (bulleted list of items they’ll post) by the instructor, just to make sure all objectives are hit.
  3. The Blackboard admin enrolls the librarian in the course with the instructor’s permission. On our campus, there’s a dedicated Librarian role in Blackboard, which has all the power of an instructor role except accessing the grade center.
  4. The librarian posts a folder of content early on Monday or the Friday before. See below for examples.
  5. During the week, the librarian answers questions in a dedicated discussion forum. This often reaches into the weekend, with several questions coming in on Sunday night, so the librarian should set expectations, e.g., “will respond to your questions within one business day.”
  6. The Blackboard admin un-enrolls the librarian.

Examples of embedded librarianship in Blackboard

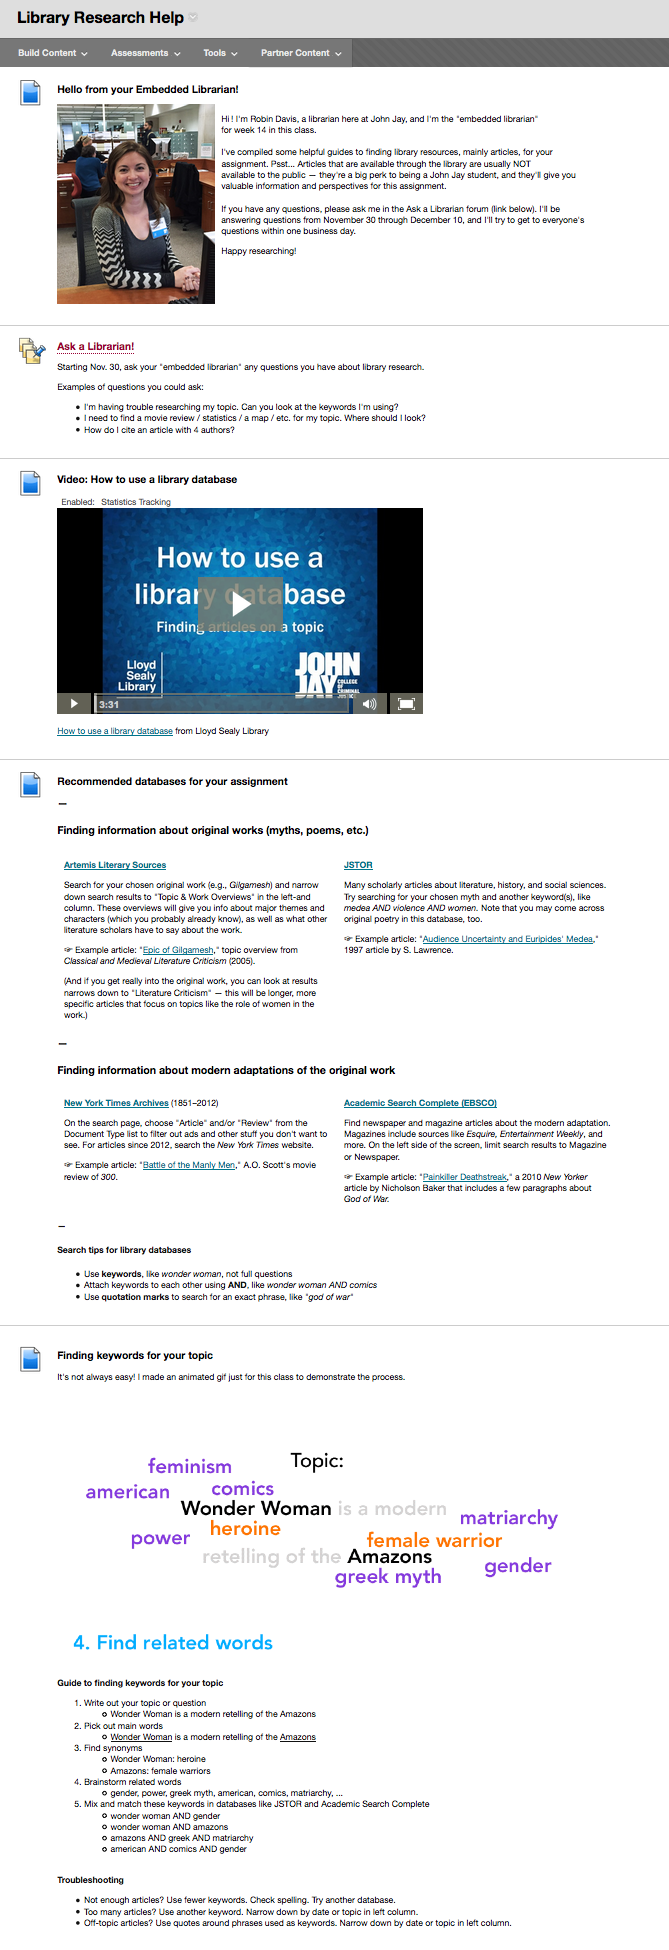
These are screenshots from courses (edited to anonymize everything but me).

Example of content posted in a Blackboard course by a librarian: tutorial video, recommended databases, animated gif about keywords, citation information
Example from a lit class. Click to view larger

Read more

CollectiveAccess work environment

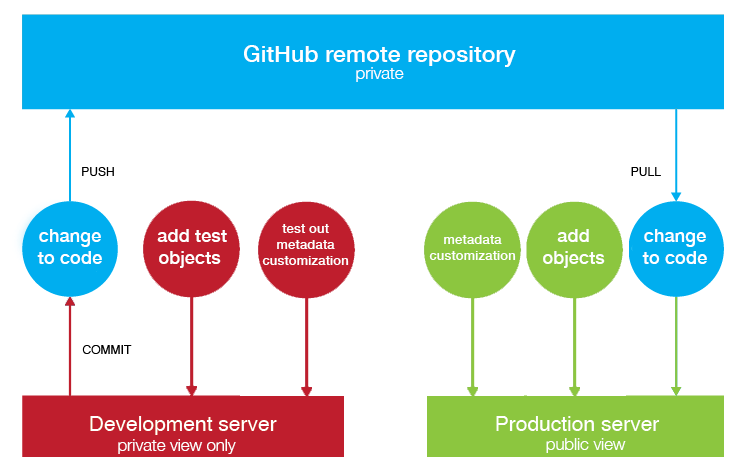
I wrote earlier about our CollectiveAccess workflow for uploading objects one-by-one and in a batch. Now I’ll share our CollectiveAccess work environment. We use two Ubuntu servers, development (test) and production (live), both with CollectiveAccess installed on them. We also use a private GitHub repository.

This is only one example of a CollectiveAccess workflow! See the user-created documentation for more.

Any changes to code (usually tweaking the layout of front end, Pawtucket) are made first on the dev instance. Once we’re happy with the changes and have tested out the site in different browsers, we commit & push the code to our private GitHub repository using Git commands on the command line. Then we pull it down to our production server, where the changes are now publicly viewable.

Any changes to objects (uploading or updating objects, collections, etc.) are made directly in the production instance. We never touch the database directly, only through the admin dashboard (Providence). These data changes aren’t done in the dev instance; we only have ~300 objects in the dev server, as more would take up too much room, and there’s no real reason why we should have all our objects on the dev instance. But if there’s a new filetype we’re uploading for the first time, or another reason an object might be funky, we add the object as a test object to the dev server.

Any changes to metadata display (adding a new field in the records) is done through the admin dashboard. I might first try the change on the dev instance, but not necessarily.

Pros of this configuration:

  • code changes aren’t live immediately and there is a structure for testing
  • all code changes can be reverted if they break the site
  • code change documentation is built into the workflow (Git)
  • objects and metadata are immediately visible to the public
  • faculty/staff working on the collections only don’t need to know anything about Git

Cons:

  • increasing mismatch between the dev and production instances’ objects and metadata display (in the future, we might do a batch import/upload if we need to)
  • this workflow has no contact with the CollectiveAccess GitHub, so updates aren’t simply pulled, but rather manually downloaded

Not pictured or mentioned above: our servers are backed up on a regular basis, on- and off-site; and anytime there’s a big code update, a snapshot is taken of the database.

CollectiveAccess super user? Add your workflow to the Sample Workflows page! 

Create a topic map of (some of) your institution’s publications in Gephi

February 5, 2015 2:47 PM Edited to add ScienceScape as a way to format your data without having to use Python
February 6, 2015 1:22 PM Edited to add instructions for cleaning index keyword data

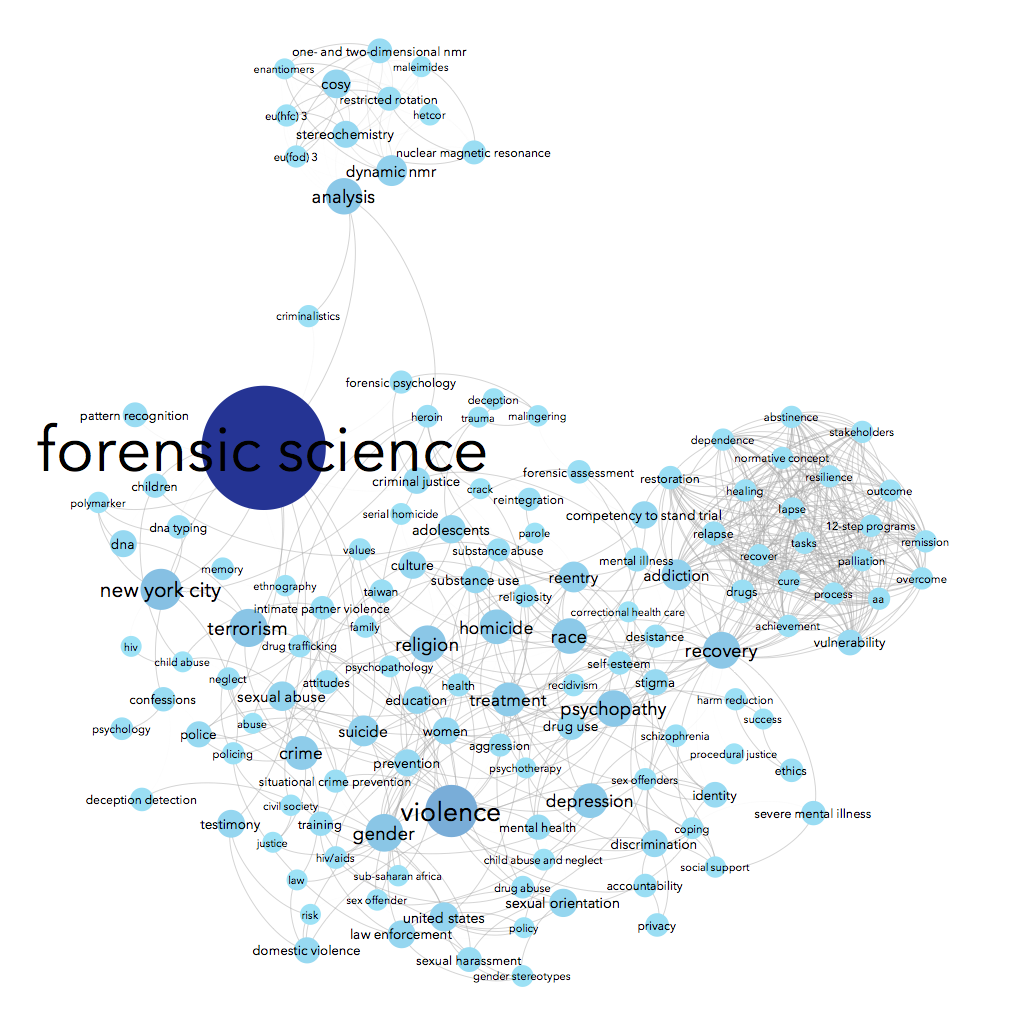
Here’s what I made this morning:

gephi topic map
Click for larger

Using data from Scopus about some of the science & social science publications written by John Jay College-affiliated authors, we can see connections between the top keywords listed for each article. For instance, John Jay faculty & grad students often write about forensic science — no surprise there, we have a renowned forensic science department! People who write about forensic science are often also writing about suicide, weapons, DNA, and/or New York City in the same article. Essentially, I made a word cloud that connects keywords that co-occur.

Perhaps you’d like to do this for your institution, too!

Gephi topic map tutorial

You will need:

  • Access to Scopus through your institution
  • Gephi (no experience necessary)
  • Plain-text editing program like TextWrangler (familiarity with regular expressions helpful)
  • Optional: Python 2.7 (some experience necessary)

Time estimation: 1.5-4 hours, depending on your familiarity with the above and on how much Gephi playtime you give yourself.

Step 1. Get the data.

Many databases will let you export some index data. For this, I used Scopus, a subscription database that offers access to publications in life sciences, social sciences, health sciences, and physical sciences. (See their breakdown of content coverage.) Other possible data sources include Ebsco (export limited to 100 queries at a time) and Web of Knowledge (export limited to 500 queries at a time).

Read more

CollectiveAccess workflow

I’ve gotten a few emails lately from other library/archive organizations asking about how we use CollectiveAccess, open-source software for digital collections at museums, archives, and libraries. Our Digital Collections at John Jay launched earlier this year and runs on CollectiveAccess. We’re really happy with it! Since it’s designed for archival-style content from the get-go, there are a lot of really nice library-friendly touches.

For those considering CollectiveAccess, it might be helpful to see what it looks like to use the software. CollectiveAccess takes a good amount of elbow grease to get up and going (more than Omeka, for instance), but the workflows are pretty straightforward once your installation is stable.

Uploading objects to CollectiveAccess

So how exactly do you populate your CollectiveAccess site? First, I’ll define a few special words that CollectiveAccess uses:

object: the thing you digitized. E.g., a photograph, a book, a document. Our rule of thumb is that one physical object = one digital object. Each object is of one type…

object type: what category is the thing? This will affect what metadata fields you’ll fill in. For instance, our object type “Trial transcript” has fields for “court” and “stenographer’s number,” which only apply to this object type.

media representation: an uploaded file. One object can have multiple representations. A photograph-type object might have two media representations: scans of the front and back. Or an oral history might have a PDF and several audio clips.

collection: the conceptual group that contains objects. A collection can have multiple objects. Again, our rule of thumb is one physical collection in the archives = one digital collection. Makes it easy! Makes total sense! (Okay, sometimes we fudge a little.) See our list of collections in our Digital Collections.

Note: the workflows below are just how we use the software. Other places may differ. But it’s useful to see examples. This also assumes that you’re logged into the back end and your metadata schema are good to go.

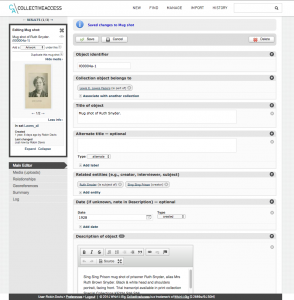
Screenshot of CollectiveAccess, editing a single object
Screenshot of CollectiveAccess, editing a single object (click for larger)

Our workflow for uploading objects one at a time

Example: we had student workers create the John Jay College Archives collection by scanning and inputting metadata, one thing at a time (reviewed later by librarians)

  1. Click “New object” in CollectiveAccess, choosing appropriate object type 
  2. Write in metadata, either basic or complete, following your organization’s conventions 
  3. Upload object (can’t be done first, as uploaded item must have identifier to latch on to, assigned in step 2) 
  4. Review, then make publicly accessible 
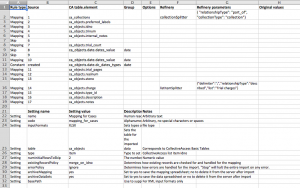
Template for data import in CollectiveAccess
Template for data import in CollectiveAccess. This works in conjunction with another spreadsheet that has metadata related to cases on it. (Click to see larger image, or email me for more example templates)

Our workflow for batch uploads, when we already have all metadata and media files

Example: migrating files and metadata out of an old database, which is what we’re currently doing for our trial transcripts collection

  1. Batch-upload metadata, using the filename as identifier 
    • data import for CA is complicated to understand at first, but once you get your spreadsheets and templates in order, it’s amazing and fast
    • this step creates a bunch of objects that don’t have media files attached to them (they’re just records) 
    • you might have to do multiple data imports,to split up big data or because you have complicated data (e.g., we have lots of overlapping person data: defendants, judges, etc.)
  2. Batch-upload files, matching on filename to existing objects. Takes a while
  3. Review, then make publicly accessible

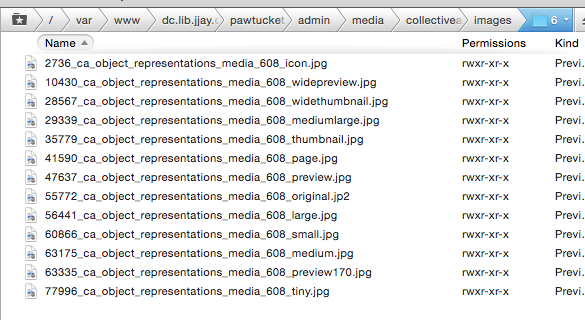
When you upload a file to CollectiveAccess, it can take a while because it creates a lot of derivatives. For example, one uploaded photo generates all these files:

Screenshot of derative filenames from CollectiveAccess
Screenshot of derivative filenames from CollectiveAccess

It also stores the original file, though it’s up to you to decide which derivative you allow users to download, if any. Our users can view objects in high resolution (in a special image viewing frame) and download full PDFs, but can only download medium-size JPGs for images. For print quality-size images, a user must contact our Special Collections librarian. This ensures accurate citations.

NYC-area CollectiveAccess events

The CollectiveAccess software is made right here in the city! In September, the friendly CollectiveAccess developers led a workshop at METRO that walked us through configuring new CA installations and importing sample data. The workshop materials are still online and are incredibly useful in piecing together the data import process.

I’m the convener of the CollectiveAccess User Group here in NYC. Our next meeting is Monday, December 1, 2014 at 10am at METRO. We’ll get behind-the-scenes tours of CollectiveAccess installations at Brooklyn Navy Yard, Roundabout Theatre Company, Booklyn, and New York Society Library. The CA team attends User Group meetings, too, and is as helpful and responsive in person as they are in the support forums. If you’re interested in CollectiveAccess, register for free & join us at METRO!