Bootstrapping an emergency library backup site

TL;DR: I Bootstrapped lib.jjay.cc, a Library backup site with the links to online resources, hosted on my personal webspace with an official-ish domain name.

Over this past weekend, the John Jay College network went down. It was pretty serious: no one off-campus could access the main College website for a while, and even when that went back up, the Library website was down for about half the weekend. Yikes!

I had done two very lucky things earlier in the month:

I’d bought jjay.cc on a whim. I’d proposed that the John Jay web department buy it as a shortlinker, and when they showed no interest, I bought it myself ($10, why not!) and have been using it as a way to shortlink Library content. (More on customizing Bit.ly later.) It looks official-ish, and no one has to know it’s on the same webspace as my other goofy websites.

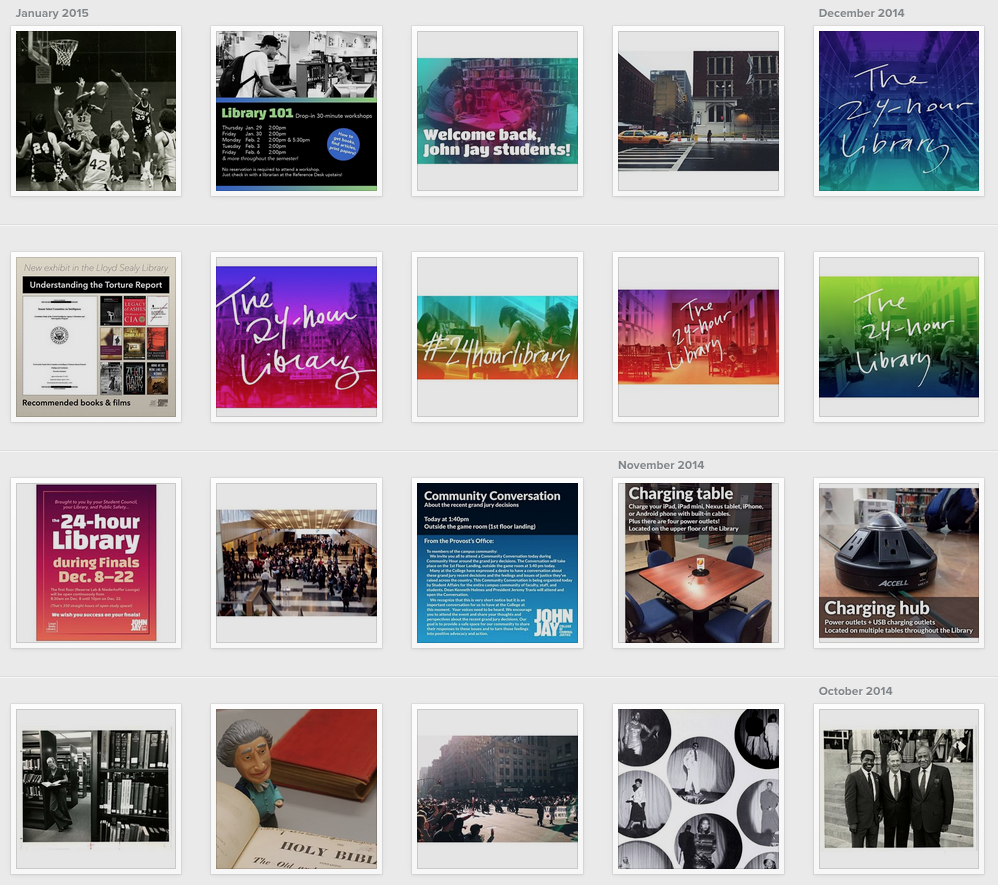
I owe a shout-out to Val Forrestal, who once gave a talk at METRO about setting up an emergency library site after getting hacked. I’d always thought, hey, I should do that sometime, just in case. And then, on Saturday, the flurry of emails about the campus-wide network issues seemed dire, and it was time. So I whipped up the Lloyd Sealy Library Emergency Backup site at lib.jjay.cc:

library backup site screenshot

With a second page for the database A-Z list:

database a-z list

How I made the site

I made a basic Bootstrap template. “Bootstrapping” just means copying and pasting various parts of the Bootstrap framework. I used the navbar, panels, and tables. What’s nice is that everything is already styled and mobile-friendly. I only had to work on two HTML files.

The on-campus network was still functioning, thank goodness, so I VPN’d in to copy the HTML from the normal library site. No need to do anything new when all the code’s already done. EZproxy was also intermittently inaccessible, but luckily, students can also use their library barcodes to log into databases that CUNY subscribes to. We noted that fact on the backup site.

I use Dreamhost as my web host and domain registration service. I created a subdomain, lib.jjay.cc, and used my usual FTP login with Transmit to upload the files. I also uploaded a restrictive robots.txt file so that this backup site would never show up on Google.

It took me under an hour to set it up. We publicized the backup site on social media and got a few grateful responses. We were in touch with the John Jay webmaster about changing the link to the library on the main college site, in case IT told us the network issues would take much longer to resolve. In the end, we just waited it out. And now we’ve got a backup site, should anything go wrong with the network or our servers. (Knock on wood.)

Takeaways: make a stripped-down version of your library website and keep it somewhere safe, somewhere you can access it on- or off-campus. And if you don’t mind spending an extra $10/yr, it might be worth it to buy an official-looking but unofficial domain name, just in case.

See through the Internet: workshop handout

See through the internet handout
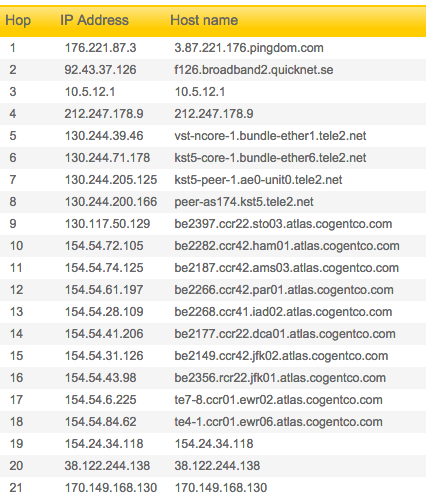
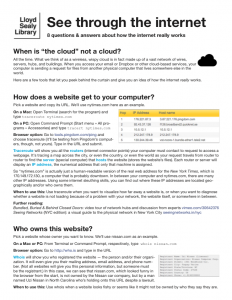
I designed a new 30-minute workshop for students this semester called “See through the internet: 8 questions & answers about how the internet really works.” I’ve given it a total of 1 time so far, to 2 people, today, but am scheduled for several more later in the semester. The subject matter is close to my heart, though, so I look for any opportunity to share this material. Perhaps you’ll find it useful, too. Here’s a draft summary of the workshop curriculum. Note that it is aimed as an intro for undergrad students.

Download handout as a PDF or just read below.

See through the internet
8 questions & answers about how the internet really works

When is “the cloud” not a cloud?

All the time. What we think of as a wireless, wispy cloud is in fact made up of a vast network of wires, servers, hubs, and buildings. When you access your email or Dropbox or other cloud-based services, your computer is sending a request for files from another physical computer that lives somewhere else in the world.

Further watching: Bundled, Buried & Behind Closed Doors: video tour of network hubs and discussion from experts

How does a website get to your computer?

Pick a website and copy its URL. We’ll use nytimes.com here as an example.

On a Mac: Open Terminal (search for the program) and type traceroute nytimes.com

On a PC: Open Command Prompt (Start menu » All programs » Accessories) and type tracert nytimes.com

Browser option: Go to tools.pingdom.com/ping and choose traceroute (it’ll be testing from Pingdom’s computers, though, not yours). Type in the URL and submit.

The traceroute from Pingdom for nytimes.com

Traceroute will show you all the routers (internet connector points) your computer must contact to request to access a webpage. It’s tracing a map across the city, or even the country, or even the world as your request travels from router to router to find the server (special computer) that hosts the website (stores the website’s files). Think of it like a highway that connects many cities: if you’re driving from San Diego to Seattle, the highway doesn’t go straight there — it also runs through other big cities like L.A. and San Francisco, because traffic is more efficient that way.

Each router or server will display an IP address, the numerical address that only that machine is assigned. So “nytimes.com” is actually just a human-readable version of the real web address for the New York Times, which is 170.149.172.130, a computer that is probably downtown. In between your computer and nytimes.com, there are many other IP addresses. Using some internet sleuthing skills, you can find out where these IP addresses are located geographically and/or who owns them.

When to use this: Use traceroute when you want to visualize how far away a website is, or when you want to diagnose whether a website is not loading because of a problem with your network, the website itself, or somewhere in between.

Further reading: Seeing Networks (NYC edition): a visual guide to the physical network in New York City

Read more

Create a topic map of (some of) your institution’s publications in Gephi

February 5, 2015 2:47 PM Edited to add ScienceScape as a way to format your data without having to use Python
February 6, 2015 1:22 PM Edited to add instructions for cleaning index keyword data

Here’s what I made this morning:

gephi topic map
Click for larger

Using data from Scopus about some of the science & social science publications written by John Jay College-affiliated authors, we can see connections between the top keywords listed for each article. For instance, John Jay faculty & grad students often write about forensic science — no surprise there, we have a renowned forensic science department! People who write about forensic science are often also writing about suicide, weapons, DNA, and/or New York City in the same article. Essentially, I made a word cloud that connects keywords that co-occur.

Perhaps you’d like to do this for your institution, too!

Gephi topic map tutorial

You will need:

  • Access to Scopus through your institution
  • Gephi (no experience necessary)
  • Plain-text editing program like TextWrangler (familiarity with regular expressions helpful)
  • Optional: Python 2.7 (some experience necessary)

Time estimation: 1.5-4 hours, depending on your familiarity with the above and on how much Gephi playtime you give yourself.

Step 1. Get the data.

Many databases will let you export some index data. For this, I used Scopus, a subscription database that offers access to publications in life sciences, social sciences, health sciences, and physical sciences. (See their breakdown of content coverage.) Other possible data sources include Ebsco (export limited to 100 queries at a time) and Web of Knowledge (export limited to 500 queries at a time).

Read more

Update to ‘Using Instagram for your library’

library instagram

Heads up: I revised ‘Using Instagram for your library‘ to add a 4 more tips. We’re heavy Instagram users now at Lloyd Sealy Library; we post 2+ times a week when school is in session; we geotag and hashtag each post; we know the other IGers on campus; and we take the time to like/comment on other organizations’ posts, and even students’ posts, with the result of gaining followers and goodwill.

Since that post was originally written, we gained 5x the number of followers we originally had. (From 40 to 200. Small potatoes, compared to our students, but still.)

Moreover, I informally surveyed freshmen throughout the last semester. All of them are on Instagram all the time. And all of them laughed when I asked if they used Facebook. (They don’t.) So IG is where it’s at.

CollectiveAccess workflow

I’ve gotten a few emails lately from other library/archive organizations asking about how we use CollectiveAccess, open-source software for digital collections at museums, archives, and libraries. Our Digital Collections at John Jay launched earlier this year and runs on CollectiveAccess. We’re really happy with it! Since it’s designed for archival-style content from the get-go, there are a lot of really nice library-friendly touches.

For those considering CollectiveAccess, it might be helpful to see what it looks like to use the software. CollectiveAccess takes a good amount of elbow grease to get up and going (more than Omeka, for instance), but the workflows are pretty straightforward once your installation is stable.

Uploading objects to CollectiveAccess

So how exactly do you populate your CollectiveAccess site? First, I’ll define a few special words that CollectiveAccess uses:

object: the thing you digitized. E.g., a photograph, a book, a document. Our rule of thumb is that one physical object = one digital object. Each object is of one type…

object type: what category is the thing? This will affect what metadata fields you’ll fill in. For instance, our object type “Trial transcript” has fields for “court” and “stenographer’s number,” which only apply to this object type.

media representation: an uploaded file. One object can have multiple representations. A photograph-type object might have two media representations: scans of the front and back. Or an oral history might have a PDF and several audio clips.

collection: the conceptual group that contains objects. A collection can have multiple objects. Again, our rule of thumb is one physical collection in the archives = one digital collection. Makes it easy! Makes total sense! (Okay, sometimes we fudge a little.) See our list of collections in our Digital Collections.

Note: the workflows below are just how we use the software. Other places may differ. But it’s useful to see examples. This also assumes that you’re logged into the back end and your metadata schema are good to go.

Screenshot of CollectiveAccess, editing a single object
Screenshot of CollectiveAccess, editing a single object (click for larger)

Our workflow for uploading objects one at a time

Example: we had student workers create the John Jay College Archives collection by scanning and inputting metadata, one thing at a time (reviewed later by librarians)

  1. Click “New object” in CollectiveAccess, choosing appropriate object type 
  2. Write in metadata, either basic or complete, following your organization’s conventions 
  3. Upload object (can’t be done first, as uploaded item must have identifier to latch on to, assigned in step 2) 
  4. Review, then make publicly accessible 
Template for data import in CollectiveAccess
Template for data import in CollectiveAccess. This works in conjunction with another spreadsheet that has metadata related to cases on it. (Click to see larger image, or email me for more example templates)

Our workflow for batch uploads, when we already have all metadata and media files

Example: migrating files and metadata out of an old database, which is what we’re currently doing for our trial transcripts collection

  1. Batch-upload metadata, using the filename as identifier 
    • data import for CA is complicated to understand at first, but once you get your spreadsheets and templates in order, it’s amazing and fast
    • this step creates a bunch of objects that don’t have media files attached to them (they’re just records) 
    • you might have to do multiple data imports,to split up big data or because you have complicated data (e.g., we have lots of overlapping person data: defendants, judges, etc.)
  2. Batch-upload files, matching on filename to existing objects. Takes a while
  3. Review, then make publicly accessible

When you upload a file to CollectiveAccess, it can take a while because it creates a lot of derivatives. For example, one uploaded photo generates all these files:

Screenshot of derative filenames from CollectiveAccess
Screenshot of derivative filenames from CollectiveAccess

It also stores the original file, though it’s up to you to decide which derivative you allow users to download, if any. Our users can view objects in high resolution (in a special image viewing frame) and download full PDFs, but can only download medium-size JPGs for images. For print quality-size images, a user must contact our Special Collections librarian. This ensures accurate citations.

NYC-area CollectiveAccess events

The CollectiveAccess software is made right here in the city! In September, the friendly CollectiveAccess developers led a workshop at METRO that walked us through configuring new CA installations and importing sample data. The workshop materials are still online and are incredibly useful in piecing together the data import process.

I’m the convener of the CollectiveAccess User Group here in NYC. Our next meeting is Monday, December 1, 2014 at 10am at METRO. We’ll get behind-the-scenes tours of CollectiveAccess installations at Brooklyn Navy Yard, Roundabout Theatre Company, Booklyn, and New York Society Library. The CA team attends User Group meetings, too, and is as helpful and responsive in person as they are in the support forums. If you’re interested in CollectiveAccess, register for free & join us at METRO!